

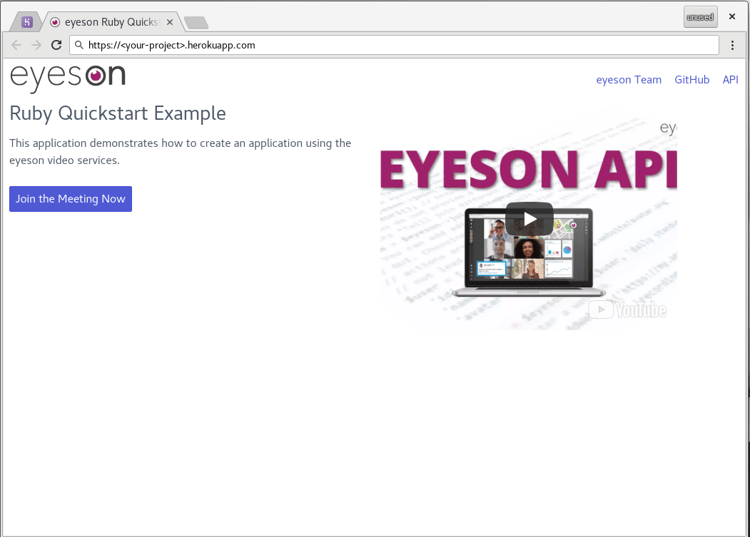
This tutorial provides a practical example of how to setup a video platform using the eyeson API service. The application uses the eyeson ruby gem, the web application framework Sinatra and hosting platform Heroku. By following the steps in the how-to you will have a website up and running, providing an entry point for a shared video meeting room. The participants can join the meeting without any registration or sign up, and will return to the application website after exiting the meeting.
The Sinatra framework is next to ruby on rails quite well known in the ruby community and was chosen for its very lightweight setup and minimal code necessary to run a service. The publishing part is done using the platform as a service provider Heroku. It handles building and deploying many kinds of applications in a very convenient and painless way. However if you wonder how a setup looks like in your preferred development environment, please leave us a message or create a GitHub issue. We are always up for a challenge ;)
Source Code
You can find the source code for the tutorial at github.com/eyeson-team/ruby-quickstart. The dependencies for the project are kept to a minimum. The ruby Gemfile exposes the eyeson ruby gem, Sinatra, as well as faker, a ruby library to generate fake/dummy data. The latter is used to set random avatars and usernames for our participants.
The core of the application is the app.rb file, that, from top to bottom, has the following tasks implemented:
- Configure the eyeson API key by a given environment variable.
- Provide a root endpoint on path
/of our application to expose a landing page. The content of the landing page is located in an embedded ruby template by Sinatra conventionviews/directory and set to fileindex.erb. - Provide an entrypoint for the meeting using the path
/jointhat creates a user and joins the room on-the-fly. The given identifierruby-quickstartensures that participants joining will be in the same meeting. - The room is configured to disable recordings and broadcasts as we have not setup any webhooks to manage those. The exit-url for the eyeson room is set to the current host. This ensures that anyone leaving the room via the exit button will return to our site.
- When a user joins a room we directly redirect to the web-GUI URL provided by the eyeson room.
require 'sinatra/base'
require 'eyeson'
require 'faker'
require 'securerandom'

# Configuration of the rubygem "eyeson"
Eyeson.configure do |config|
  config.api_key = ENV['EYESON_API_KEY']
end

# Application Main
class EyesonQuickstartApp < Sinatra::Base

  # Root endpoint listening on the HTTP GET method and rendering the content
  # of views/index.erb
  get '/' do
    erb :index
  end

  # Join endpoint, joins the user to the video meeting room and redirects the
  # client to the web GUI.
  get '/join' do
    redirect Eyeson::Room.join(
      id: 'ruby-quickstart',
      name: 'Ruby Quickstart Room',
      user: {
        id: SecureRandom.uuid, # unique identifier for each user
        name: Faker::BojackHorseman.character, # random username
        avatar: Faker::Avatar.image # random avatar image URL
      },
      options: {
        recording_available: false, # disallow recording of the meeting
        broadcast_available: false, # disallow broadcasting of the meeting
        exit_url: "https://#{request.host}/" # set return point
      }
    ).url # directly return the web GUI URL from result to the redirect method
  end

  run! if app_file == $0
end
The content of the landing page is located in views/index.erb, it consists of a very basic HTML document where the single interactive element of interest in our application is a button that links to our /join path.
Other files in the repository are present to extend or configure the application service: The Procfile and config.ru provide instructions for Heroku on how to run the application. The public directory contains common assets like a logo and favicon file.
Prerequisites and Setup
Ensure you have git and the Heroku cli installed on your computer. If you don’t have an eyeson account yet, sign up at developers.eyeson.team and request your personal API key. You get an API key free of charge for a monthly limit of video meeting minutes, there is no credit card or other payment required. Now create a new Heroku project and set a new config var EYESON_API_KEY in project settings. We are already good to build and deploy the project.
$ git clone https://github.com/eyeson-team/eyeson-ruby.git eyeson-quickstart
$ cd eyeson-quickstart
$ heroku git:remote -a  # Register the project remote
$ git push heroku master # Push and trigger Heroku's build and deployment
Visit the application at <heroku-project-name>.herokuapp.com.
Local Setup
If you want to test the setup locally, you’ll require ruby (version >= 2.4) and executing the commands from the following snippets.
$ git clone https://github.com/eyeson-team/eyeson-ruby.git eyeson-quickstart
$ cd eyeson-quickstart
$ bundle install # Install ruby libraries.
# Add a space at the beginning of the next command, so this line does appear in your cli history.
$  EYESON_API_KEY=... bundle exec ruby app.rb
Visit the application at http://localhost:4567 .
